- bootstrap-tableとは?
- 導入方法、使用するための準備
- datatablesを日本語化する方法
- バグ、苦労した点
- まとめ
今回は上記のテーマで解説していきます。
細かいところについて詳しく解説していきますので、是非参考にして頂ければと思います。
Table of Contents
〔bootstrap datatables 使い方〕bootstrap-tableとは
bootstrapのテーブルに機能を追加できる拡張ライブラリです。
便利な機能を追加したテーブルといえば分かりやすいでしょうか。
主に下記の機能が追加できます。
- 件数制限機能
- ページング機能 (10件ずつ表示してページ切り替えするなど)
- ソート機能 (列の見出しをクリックして並び替え)
- フィルタ機能 (全データのキーワード検索)
- スクロール機能 (表が大きい場合にスクロールバーを追加する)
- 外観がキレイ
〔bootstrap datatables 使い方〕導入方法、使用するための準備
DataTablesを使用するためにはjQueryが必須になります。
ですので、
- CDNから読み込む(テンプレートをコピペするだけ)
- ファイル一式をダウンロードしてサーバーに置く
の2種類どちらかを行う必要があります。
今回はカンタンなCDNのほうを紹介します。
どうしても「ファイル一式をダウンロードしてサーバーに置きたい」という方は過去に紹介しているのでbootstrap 4の導入方法をご覧ください。
CDNで導入する方法
CDNとは?と思う方がいらっしゃると思いますが、カンタンに言えばコピペです。
- 公式ページのStarter templateをまるっとコピー

- それをお使いのプログラミングツールにペースト


これだけでOKです。カンタンですよね。
※注意※
公式ページのものをそのまま使用すると、言語設定が「英語」になります。
そして後ほど詳しく解説するのですが、DataTablesが作動しません。
ですので、下記に私が用意したテンプレを使用することをオススメします。
↓下記をお使いのプログラミングツールにコピー&ペーストするだけで大丈夫です。
日本向けに一部変更させてますので、本当にこのまますぐ使用できます。
|
1 2 3 4 5 6 7 8 9 10 11 12 13 14 15 16 17 18 19 20 21 22 23 24 25 |
<!doctype html> <html lang="ja"> <head> <!-- Required meta tags --> <meta charset="utf-8"> <meta name="viewport" content="width=device-width, initial-scale=1, shrink-to-fit=no"> <!-- Bootstrap CSS --> <link rel="stylesheet" href="https://stackpath.bootstrapcdn.com/bootstrap/4.5.0/css/bootstrap.min.css" integrity="sha384-9aIt2nRpC12Uk9gS9baDl411NQApFmC26EwAOH8WgZl5MYYxFfc+NcPb1dKGj7Sk" crossorigin="anonymous"> <title>Hello, world!</title> </head> <body> <h1>Hello, world!</h1> <!-- Optional JavaScript --> <!-- jQuery first, then Popper.js, then Bootstrap JS --> <script src="https://code.jquery.com/jquery-3.5.1.min.js" integrity="sha256-9/aliU8dGd2tb6OSsuzixeV4y/faTqgFtohetphbbj0=" crossorigin="anonymous"></script> <script src="https://cdn.jsdelivr.net/npm/popper.js@1.16.0/dist/umd/popper.min.js" integrity="sha384-Q6E9RHvbIyZFJoft+2mJbHaEWldlvI9IOYy5n3zV9zzTtmI3UksdQRVvoxMfooAo" crossorigin="anonymous"></script> <script src="https://stackpath.bootstrapcdn.com/bootstrap/4.5.0/js/bootstrap.min.js" integrity="sha384-OgVRvuATP1z7JjHLkuOU7Xw704+h835Lr+6QL9UvYjZE3Ipu6Tp75j7Bh/kR0JKI" crossorigin="anonymous"></script> </body> </html> |
datatablesを設置する
headerに下記を挿入します。
|
1 |
<link rel="stylesheet" href="https://cdn.datatables.net/1.10.21/css/dataTables.bootstrap4.min.css"/> |


bodyの最後に下記を挿入します。
|
1 2 |
<script src="https://cdn.datatables.net/1.10.21/js/jquery.dataTables.min.js"></script> <script src="https://cdn.datatables.net/1.10.21/js/dataTables.bootstrap4.min.js"></script> |


全て挿入されたものが下記です。
「既に難しくてわかんないよ!」という方は↓このコードに置き換えれば、今までの工程が全て完了します。
|
1 2 3 4 5 6 7 8 9 10 11 12 13 14 15 16 17 18 19 20 21 22 23 24 25 26 27 28 |
<!doctype html> <html lang="ja"> <head> <!-- Required meta tags --> <meta charset="utf-8"> <meta name="viewport" content="width=device-width, initial-scale=1, shrink-to-fit=no"> <!-- Bootstrap CSS --> <link rel="stylesheet" href="https://stackpath.bootstrapcdn.com/bootstrap/4.5.0/css/bootstrap.min.css" integrity="sha384-9aIt2nRpC12Uk9gS9baDl411NQApFmC26EwAOH8WgZl5MYYxFfc+NcPb1dKGj7Sk" crossorigin="anonymous"> <link rel="stylesheet" href="https://cdn.datatables.net/1.10.21/css/dataTables.bootstrap4.min.css"/> <title>Hello, world!</title> </head> <body> <h1>Hello, world!</h1> <!-- Optional JavaScript --> <!-- jQuery first, then Popper.js, then Bootstrap JS --> <script src="https://code.jquery.com/jquery-3.5.1.min.js" integrity="sha256-9/aliU8dGd2tb6OSsuzixeV4y/faTqgFtohetphbbj0=" crossorigin="anonymous"></script> <script src="https://cdn.jsdelivr.net/npm/popper.js@1.16.0/dist/umd/popper.min.js" integrity="sha384-Q6E9RHvbIyZFJoft+2mJbHaEWldlvI9IOYy5n3zV9zzTtmI3UksdQRVvoxMfooAo" crossorigin="anonymous"></script> <script src="https://stackpath.bootstrapcdn.com/bootstrap/4.5.0/js/bootstrap.min.js" integrity="sha384-OgVRvuATP1z7JjHLkuOU7Xw704+h835Lr+6QL9UvYjZE3Ipu6Tp75j7Bh/kR0JKI" crossorigin="anonymous"></script> <script src="https://cdn.datatables.net/1.10.21/js/jquery.dataTables.min.js"></script> <script src="https://cdn.datatables.net/1.10.21/js/dataTables.bootstrap4.min.js"></script> </body> </html> |


コチラも「どうしても公式サイトのを使用したい!」というかたはコチラからどうぞ。
bootstrap4のボタンを押し、その下のRelease部分をコピペして挿入してください。
〔bootstrap datatables 使い方〕datatablesを日本語化する方法
本来は下記のようなコードですが、
|
1 2 3 4 5 |
<script> jQuery(function($){ $("#table1").DataTable(); }); </script> |
下記のように改変します。
|
1 2 3 4 5 6 7 8 9 10 |
<script> $(function(){ // datatableの設定を変更 $("#table1").DataTable({ "language": { "url": "//cdn.datatables.net/plug-ins/1.10.16/i18n/Japanese.json" } }); }); </script> |
このまま使用できるのでコピペでOKです。


そして、全てが入った状態のテンプレがこちらです。
ここまでの作業が難しいという方は↓このコードにまるっと置き換えればココまでの工程が完了します。
|
1 2 3 4 5 6 7 8 9 10 11 12 13 14 15 16 17 18 19 20 21 22 23 24 25 26 27 28 29 30 31 32 33 34 35 36 37 38 |
<!doctype html> <html lang="ja"> <head> <!-- Required meta tags --> <meta charset="utf-8"> <meta name="viewport" content="width=device-width, initial-scale=1, shrink-to-fit=no"> <!-- Bootstrap CSS --> <link rel="stylesheet" href="https://stackpath.bootstrapcdn.com/bootstrap/4.5.0/css/bootstrap.min.css" integrity="sha384-9aIt2nRpC12Uk9gS9baDl411NQApFmC26EwAOH8WgZl5MYYxFfc+NcPb1dKGj7Sk" crossorigin="anonymous"> <link rel="stylesheet" href="https://cdn.datatables.net/1.10.21/css/dataTables.bootstrap4.min.css" /> <title>Hello, world!</title> </head> <body> <h1>Hello, world!</h1> <!-- Optional JavaScript --> <!-- jQuery first, then Popper.js, then Bootstrap JS --> <script src="https://code.jquery.com/jquery-3.5.1.min.js" integrity="sha256-9/aliU8dGd2tb6OSsuzixeV4y/faTqgFtohetphbbj0=" crossorigin="anonymous"></script> <script src="https://cdn.jsdelivr.net/npm/popper.js@1.16.0/dist/umd/popper.min.js" integrity="sha384-Q6E9RHvbIyZFJoft+2mJbHaEWldlvI9IOYy5n3zV9zzTtmI3UksdQRVvoxMfooAo" crossorigin="anonymous"></script> <script src="https://stackpath.bootstrapcdn.com/bootstrap/4.5.0/js/bootstrap.min.js" integrity="sha384-OgVRvuATP1z7JjHLkuOU7Xw704+h835Lr+6QL9UvYjZE3Ipu6Tp75j7Bh/kR0JKI" crossorigin="anonymous"></script> <script src="https://cdn.datatables.net/1.10.21/js/jquery.dataTables.min.js"></script> <script src="https://cdn.datatables.net/1.10.21/js/dataTables.bootstrap4.min.js"></script> <script> $(function () { // datatableの設定を変更 $("#table1").DataTable({ "language": { "url": "//cdn.datatables.net/plug-ins/1.10.16/i18n/Japanese.json" } }); }); </script> </body> </html> |
注意点
bootstrapの場合は、datatablesはbodyの最後に挿入します。
通常、cssを使用している場合は、header内に設置しますがbootstrapではheader内に設置しても動作しません。
datatablesはbodyの最後に挿入します。
〔bootstrap datatables 使い方〕table属性を設置していく
基本的に通常のtableの設置とほとんど同じで大丈夫です。
少し、違うのが <table id=”〇〇” class=”table table-bordered”>と設置することです。
理屈はいいから使えればなんでも良いという方向けに下記にシンプルなdatatableの入ったサンプルテンプレートを準備してます。
<table id=”〇〇”の〇の部分は、
|
1 2 3 4 5 |
<script> jQuery(function($){ $(""#table1"").DataTable(); }); </script> |
部分の $の後ろ側と一致してればOKです。

場所はここにあるので確認してみてください。
〔bootstrap datatables 使い方〕バグ、苦労した点
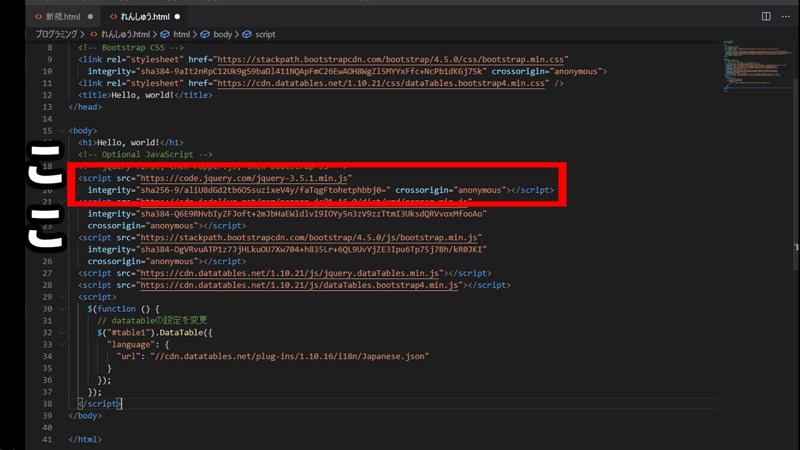
今までのところで私が用意したテンプレートをそのまま使用している場合は、問題ないはずですが、公式サイトから引用、使用している場合、正しく動作しないと思います。
理由は、datatablesはslimのjsでは動作しないのです。
細かい話をすると、slimは余分なjQueryの機能を削除しパフォーマンスを向上させている版でajax部分の記述がなくなります。
ということで、jQueryCDNのサイトからslimじゃないバージョンをコピーしてきます。
それが下記になります。
|
1 2 3 4 |
<script src="https://code.jquery.com/jquery-3.5.1.min.js" integrity="sha256-9/aliU8dGd2tb6OSsuzixeV4y/faTqgFtohetphbbj0=" crossorigin="anonymous"></script> |
これをslimと入れ替えてあげます。

入れ替える前のテンプレ。
|
1 2 3 4 5 6 7 8 9 10 11 12 13 14 15 16 17 18 19 20 21 22 23 24 25 26 27 28 29 30 31 32 33 34 35 36 37 38 39 |
<!doctype html> <html lang="ja"> <head> <!-- Required meta tags --> <meta charset="utf-8"> <meta name="viewport" content="width=device-width, initial-scale=1, shrink-to-fit=no"> <!-- Bootstrap CSS --> <link rel="stylesheet" href="https://stackpath.bootstrapcdn.com/bootstrap/4.5.0/css/bootstrap.min.css" integrity="sha384-9aIt2nRpC12Uk9gS9baDl411NQApFmC26EwAOH8WgZl5MYYxFfc+NcPb1dKGj7Sk" crossorigin="anonymous"> <link rel="stylesheet" href="https://cdn.datatables.net/1.10.21/css/dataTables.bootstrap4.min.css" /> <title>Hello, world!</title> </head> <body> <h1>Hello, world!</h1> <!-- Optional JavaScript --> <!-- jQuery first, then Popper.js, then Bootstrap JS --> <script src="https://code.jquery.com/jquery-3.5.1.slim.min.js" integrity="sha384-DfXdz2htPH0lsSSs5nCTpuj/zy4C+OGpamoFVy38MVBnE+IbbVYUew+OrCXaRkfj" crossorigin="anonymous"></script> <script src="https://cdn.jsdelivr.net/npm/popper.js@1.16.0/dist/umd/popper.min.js" integrity="sha384-Q6E9RHvbIyZFJoft+2mJbHaEWldlvI9IOYy5n3zV9zzTtmI3UksdQRVvoxMfooAo" crossorigin="anonymous"></script> <script src="https://stackpath.bootstrapcdn.com/bootstrap/4.5.0/js/bootstrap.min.js" integrity="sha384-OgVRvuATP1z7JjHLkuOU7Xw704+h835Lr+6QL9UvYjZE3Ipu6Tp75j7Bh/kR0JKI" crossorigin="anonymous"></script> <script src="https://cdn.datatables.net/1.10.21/js/jquery.dataTables.min.js"></script> <script src="https://cdn.datatables.net/1.10.21/js/dataTables.bootstrap4.min.js"></script> <script> $(function () { // datatableの設定を変更 $("#table1").DataTable({ "language": { "url": "//cdn.datatables.net/plug-ins/1.10.16/i18n/Japanese.json" } }); }); </script> </body> </html> |
入れ替えた後のテンプレ
|
1 2 3 4 5 6 7 8 9 10 11 12 13 14 15 16 17 18 19 20 21 22 23 24 25 26 27 28 29 30 31 32 33 34 35 36 37 38 |
<!doctype html> <html lang="ja"> <head> <!-- Required meta tags --> <meta charset="utf-8"> <meta name="viewport" content="width=device-width, initial-scale=1, shrink-to-fit=no"> <!-- Bootstrap CSS --> <link rel="stylesheet" href="https://stackpath.bootstrapcdn.com/bootstrap/4.5.0/css/bootstrap.min.css" integrity="sha384-9aIt2nRpC12Uk9gS9baDl411NQApFmC26EwAOH8WgZl5MYYxFfc+NcPb1dKGj7Sk" crossorigin="anonymous"> <link rel="stylesheet" href="https://cdn.datatables.net/1.10.21/css/dataTables.bootstrap4.min.css" /> <title>Hello, world!</title> </head> <body> <h1>Hello, world!</h1> <!-- Optional JavaScript --> <!-- jQuery first, then Popper.js, then Bootstrap JS --> <script src="https://code.jquery.com/jquery-3.5.1.min.js" integrity="sha256-9/aliU8dGd2tb6OSsuzixeV4y/faTqgFtohetphbbj0=" crossorigin="anonymous"></script> <script src="https://cdn.jsdelivr.net/npm/popper.js@1.16.0/dist/umd/popper.min.js" integrity="sha384-Q6E9RHvbIyZFJoft+2mJbHaEWldlvI9IOYy5n3zV9zzTtmI3UksdQRVvoxMfooAo" crossorigin="anonymous"></script> <script src="https://stackpath.bootstrapcdn.com/bootstrap/4.5.0/js/bootstrap.min.js" integrity="sha384-OgVRvuATP1z7JjHLkuOU7Xw704+h835Lr+6QL9UvYjZE3Ipu6Tp75j7Bh/kR0JKI" crossorigin="anonymous"></script> <script src="https://cdn.datatables.net/1.10.21/js/jquery.dataTables.min.js"></script> <script src="https://cdn.datatables.net/1.10.21/js/dataTables.bootstrap4.min.js"></script> <script> $(function () { // datatableの設定を変更 $("#table1").DataTable({ "language": { "url": "//cdn.datatables.net/plug-ins/1.10.16/i18n/Japanese.json" } }); }); </script> </body> </html> |
〔bootstrap datatables 使い方〕まとめ
ここまでがbootstrap datatablesの基本的な使い方になります。
要約すると
- 導入するにはCDNが楽ちん
- datatablesはslimのjsでは動作しないため書き換えが必要
- 日本語化するには下記のように変化
|
1 |
<script> $(function(){ // datatableの設定を変更 $("#table1").DataTable({ "language": { "url": "//cdn.datatables.net/plug-ins/1.10.16/i18n/Japanese.json" } }); }); </script> |
- table属性を設置する時は頭に<table id=”〇〇” class=”table table-bordered”>つける
となります。
それでは最後までありがとうございました。


